| Running the Client > Getting Started | <<Previous | Next>> |
This section describes how to launch the client and gives a basic overview of the user interface. Before starting the client make sure that the server has been started as described here.
cd /user/home/stream-vis-0.6.0/chmod +x vis.sh./vis.shWhen the client is started the main display window (described later) appears along with the following dialog:

Enter the host (host name or IP address) and port at which the server was started in the appropriate fields and click the "OK" button. A default host and port number can be specified in the visualizer.ini file (in the root directory of the client code), but you need to rebuild the client by re-running ant for your changes to take effect.
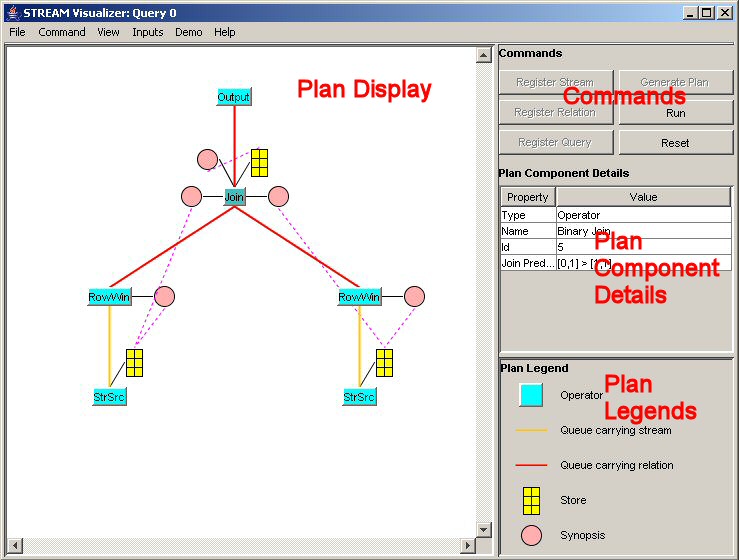
When the client connects, the following screen will be displayed (but with empty panes when you start with no queries registered):

It is divided into 4 panes:
The Plan Display/Main Display pane is mainly used to view query execution plans as shown in the figure above. It can also be used to view the list of registered streams and relations and the list of registered queries. The user can switch from one view to another by using the View menu.
The Commands pane contains several command buttons, each of them corresponds to a specific command that the user can issue to the server. Please see Commands below for more details about commands.
When the user is viewing a plan, she can select individual components of the plan using the a mouse click, and the Plan Component Details pane shows properties of the selected component.
The Plan Legend identifies the icons that are used within query plans.
There are six commands that you can issue to the server:
Menu options are explained in greater detail later. Here is a brief overview.
The File menu contains commands to save registries (including streams, relations, queries and views) into a user specified file, to load registries from file, and to exit the client.
The Command menu contains the above mentioned six commands: register stream, register relation, register query, generate plan, run and reset. It also provides a "complete reset" option, which stops all running queries and drops all registered streams, relations and queries. Basically, the user can start from fresh again.
The View menu can be used to switch the display in the "Plan Display" pane. You can let it show all registered streams and relations, all registered queries, or the execution plan for each query (if the plan has been generated).
The Inputs menu provides a way to send tuples of a stream source into the STREAM system. For each registered stream/relation, there will be an entry for it. Selecting an entry from this menu will bring up a control that allows you to bind a data file to a stream source, to start and pause sending tuples, and to adjust the tuple sending rate.
The Demo menu provides some predefined demos for you to give the STREAM system a quick try. You can execute each of the demos by a simple click.
Some plan components in the "Plan Display" pane has their own Context menus. You can access the context menu by right clicking on the plan component. Most of them are related to monitors, through which you can track system performance while the query is executing.
A more detailed explanation of all the menu items is available in the Menu Reference section.
| Running the Client > Getting Started | <<Previous | Next>> |
Last modified: Thu Jan 27 2005