
STREAM Online Help > Running the System
This section runs through a simple example scenario for running the STREAM system.
Queries in the STREAM system are expressed in the CQL (Continuous Query Language) declarative query language for data stream systems. A quick introduction to CQL is available here. We recommend that users of the demo read this introduction to CQL before attempting to register your own queries. The CQL syntax supported currently by the STREAM system differs in minor syntactic ways from the example CQL queries that have appeared in papers and talks on CQL and also from the queries in the Stream Query Repository. The authoritative source on CQL query syntax supported currently by STREAM is available here. This document also lists the semantic checks done by the STREAM CQL query parser.
The following example provides a step-by-step tutorial in using the client to register two streams and run a simple query over them.
Note: For convenience, the demo automatically registers several streams, including "R" and "S", when it starts up. As a result, steps 1 and 2 below are technically not necessary and will have no effect. However, they are included for instructive purposes; if you wish use data streams other than the predefined ones in your queries, you will have to register them.
1. Register the first stream, "R"
The first step is to make the system aware of streams over which
data will be sent. This is similar to creating a table in a
conventional relational database. To register a stream, select the
"Register Stream" option from the "File" Menu. The following dialog
should be displayed (without the contents which are shown
here for illustrative purposes):
The "Stream Name" field specifies the name of the stream to register, and the Stream Attributes field specifies the schema for the stream. This particular stream has two columns, "name" which is a string of at most 20 characters, and "value" which is an integer.
2. Register the second stream, "S"
For the query we will run below, we will also need to register a second
stream, with Stream Name "S" and Stream Attributes
"name char20, value integer". This can be done with the same procedure as
step 1.
3. Register a query over these streams
CQL queries can be submitted to the system using the "Register CQL Query"
command on the "File" menu.
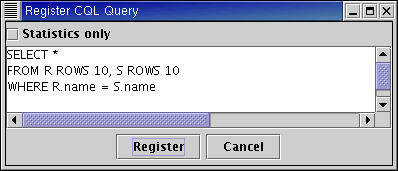
Enter the query shown in the image above, and then click the "Register" button. Now the query will execute continuously as tuples arrive on R and S. This particular query is a windowed join on the attribute "name" over windows of the last 10 rows of streams R and S. After a second or two a scrollable table will appear in a separate window on the screen. The query results will be displayed here in increasing timestamp order going bottow to top. The new query will also appear on the "View" menu. Select the query from the "View" menu. The following query plan will be shown in the "Plan Display" pane:
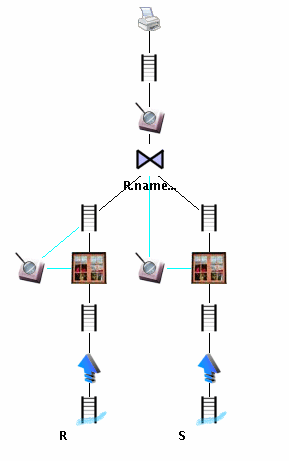
Click on a few of the plan entities and notice that their properties show up in the "Entity Details" pane in the upper right. Entities can be dragged around to rearrange the "Plan Display" window, either individually or as entire subtrees by holding down the "shift" key.
4. Send data on the streams
Registering the query
will bring up a result window. However, without any data
streaming through the system, no results will be produced.
There are a number of methods for sending data to the system for a stream that has been registered with the system. (Stream registration has to be done independently of stream source creation.) )The easiest is by using the client to stream data to the server from a predefined text file. To do this, go to the "Stream Source" menu, and select "R". This will bring up the following control:
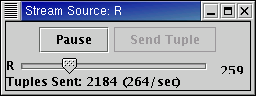
Clicking on the "Start" button will begin sending tuples on this stream. The slider controls the rate at which tuples are sent to the system.
Select "S" from the "Stream Source" menu to open a stream source for the other stream. Once both sources are sending stream tuples, results should begin to appear in the results window. Please see our help page on CQL in case you are unfamiliar with the semantics of CQL. The demo client displays query results in increasing timestamp order from bottom to top of the scrollable results window. That is, more recent tuples are displayed on top. Furthermore, the demo client is configured to display the 10,000 most recent updates to the query result. Once the number of result updates so far exceeds 10,000, the oldest ones are dropped from the bottom of the scrollable results window.
Detailed information on stream tuple formats and creating or registering new stream sources is available here along with a complete description of the "Stream Source" menu.
5. Set up an attribute (property) monitor (optional)
Once the query is executing, we can add attribute monitors to track its performance characteristics. For this example, we'll add a simple monitor that doesn't give us much information, but will demonstrate how to create one.
First, right click on the queue directly beneath the printer icon at the top of the query plan. The following dialog will be displayed:
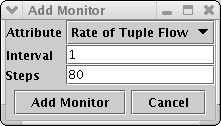
This dialog box will allow us to select the attribute to monitor, the reporting interval (in seconds), and the number of samples to display. The defaults are fine for our purposes, so just click on the "Add Monitor" button. A graph that looks like the one below should appear next to the queue:
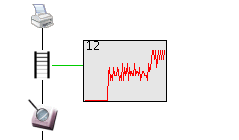
As tuples flow through the system and out the output operator at the top, the rate of tuple flow in tuples per second will be shown on this graph. Increasing the rate of flow on streams R and/or S will increase the rate of flow out of the system, and lowering them will lower the rate, as expected.
More details on attribute monitors, including the use of a system monitoring stream SysStream, are provided later.