Physical Setup
Locals Room
The locals room (Boondock) will involve four pieces of equipment:
- Sound Pressure Level (SPL) meter
- One silverback Toshiba laptop (Poe)
- Loudspeaker: Subwoofer box plus the Right-side speaker
(i.e. the left-side speaker not used.)
- Texai
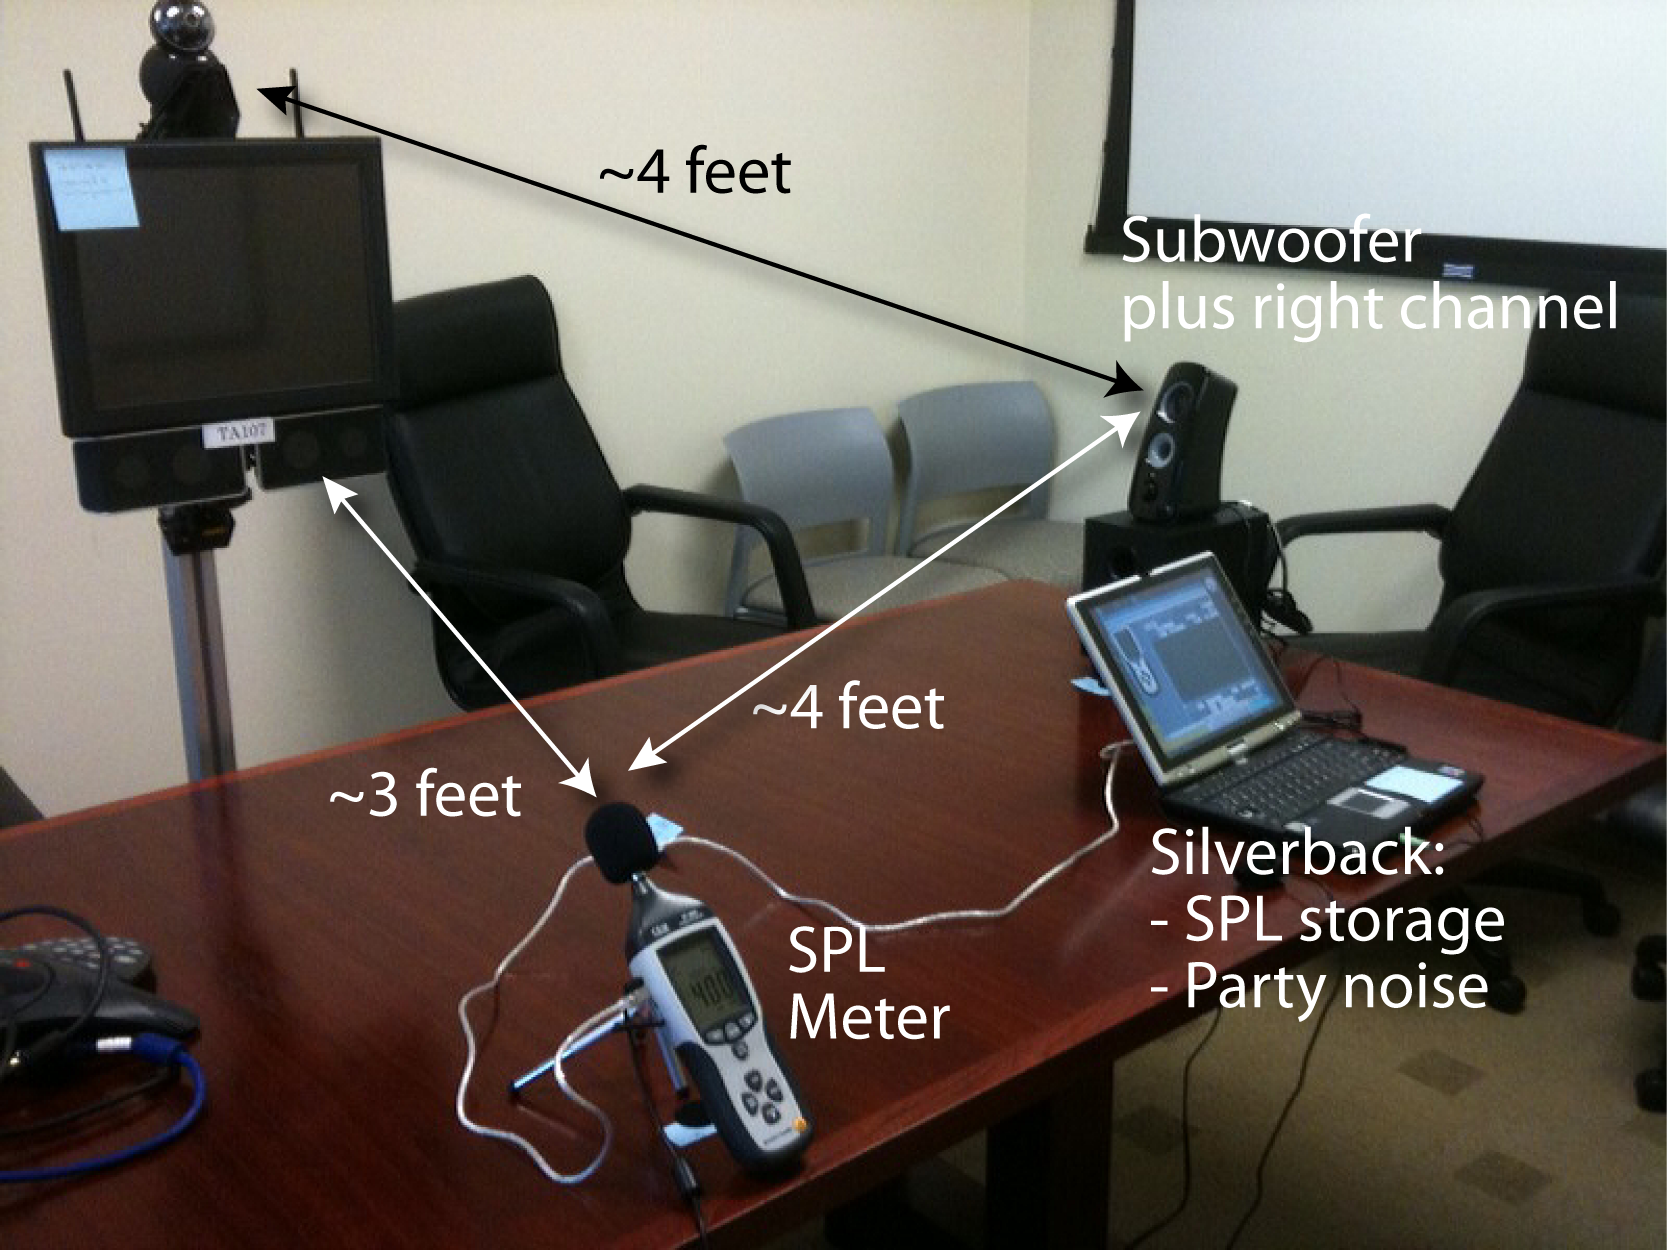
Figure 1 (below): Conceptual Setup of Locals Room:

See Photo 1 for an
overview of the physical items.
 .
.
- SPL meter: Screw onto tripod. Place as close to edge of table
as possible so that foam ball is more or less above velcro dot.
- Attach power cable (hiding under black rubber flap on the
left side of the housing).
- Attach USB cable to SPL meter (same place as power). Don't
attach computer side of USB cable yet.
- Silverback laptop: Attach power, boot up. PWD is 'willow' (the
only user account is 'paepcke')
- Loudspeaker:
- Place subwoofer on table, speaker cone facing the Texai and
SPL meter, such that the face of the subwoofer is above the
velcro (~4ft from both the Texai mike and the SPL meter).
- Attach power to subwoofer
- Attach just the Right-side speaker to the subwoofer. The
left-side speaker is not used.
- Set bass knob in back of the subwoofer to the forth dot
from the left.
- Attach loudspeaker to headset output of silverback (front)
- Texai:
- Place Texai across the table from the SPL meter. Have the
metal 'torso' of the Texai touch the table. (distance from
Texai speakers to SPL meter will thereby be roughly 3ft.)
Pilots Room
For the Pilots Room, please refer to Figures 2 and 3. Figure 2 shows
the conceptual setup of the room. Figure 3 shows the audio mixer
connections.
In the pilots
room the following equipment is used:
- Sound Pressure Level (SPL) meter.
- One silverback Toshiba laptop (Kipling).
- Loudspeaker: the speaker underneath the large office computer
display.
- The Eurorack audio mixer.
- Pilot's headset with boom microphone.
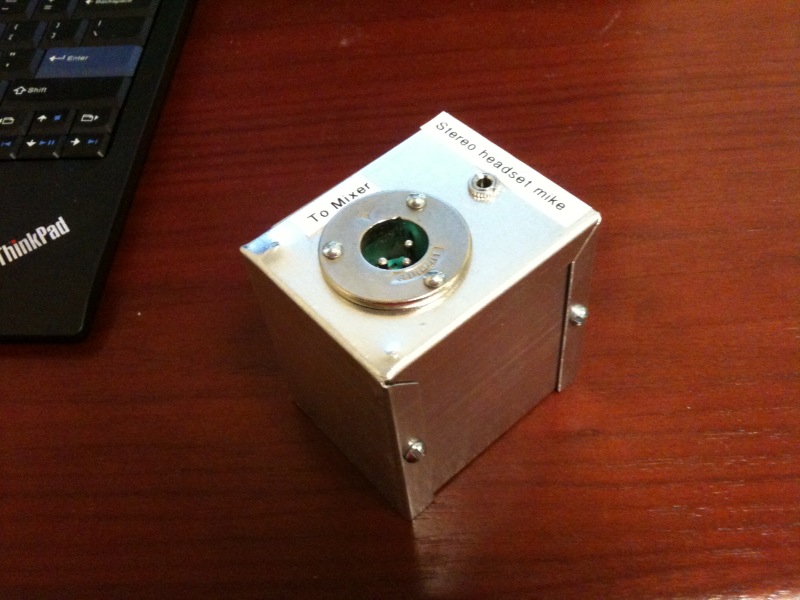
- The microphone adapter box (Photo 2).
- The Zoom digital recorder (Photo 3).
Figure 2 (below): Conceptual Setup of Pilot Room:

Figure 3 (below): Eurorack Audio Mixer Connections in Pilot Room:
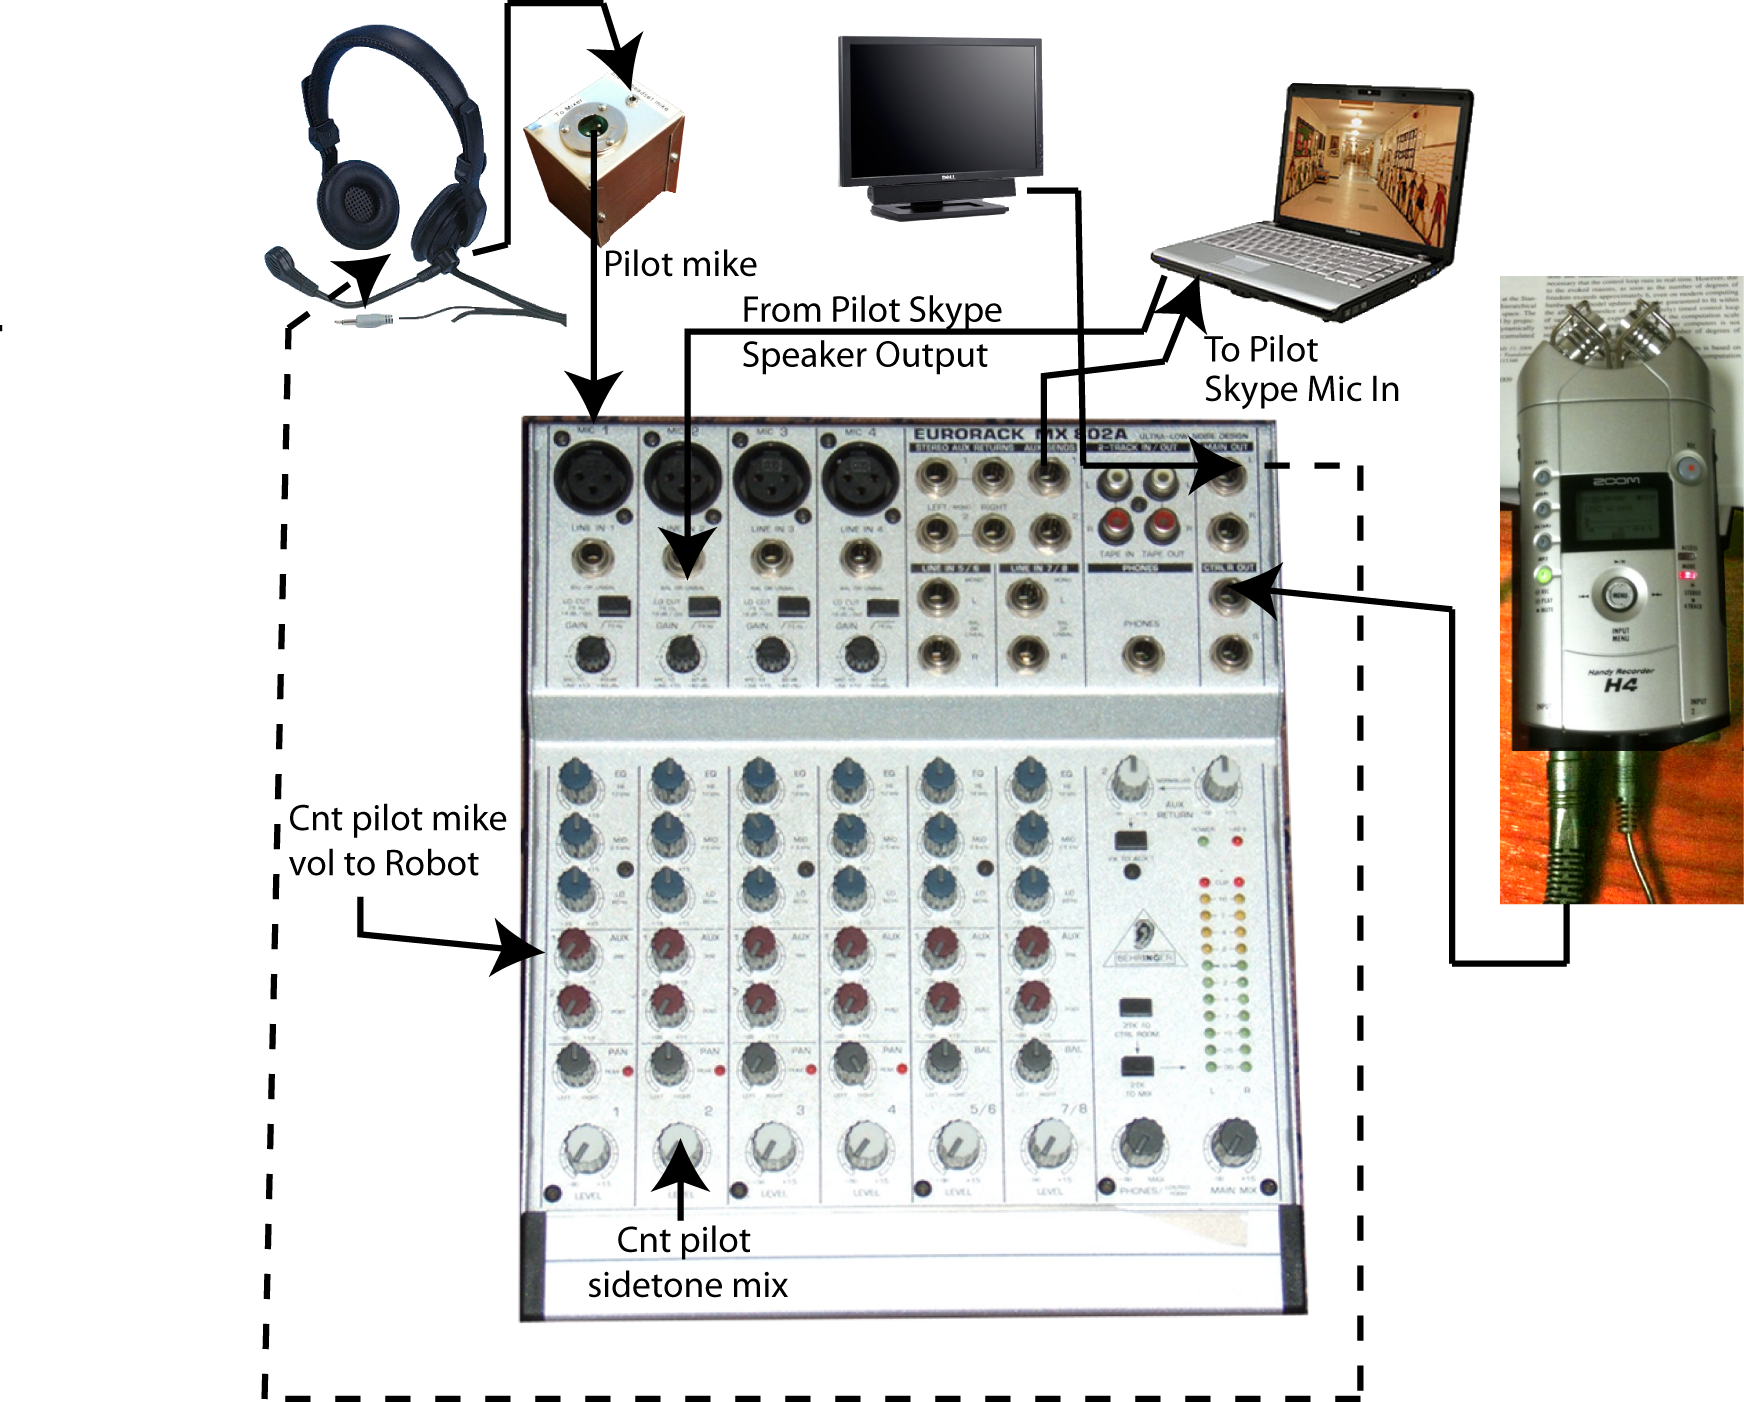
Photo 2 (below): The microphone adapter box:
You best follow this sequence of steps for setup, without turning
anything on till the end.
- Place mixer, microphone adapter box, Zoom Digital Recorder, and
the Kipling silverback on the table.
- Run wires from mixer to their destination
- Attach camera to Kipling silverback.
- Adjust all the buttons on the mixer
- Fire up Kipling
- Establish a Skype connection on Kipling and check that sound
works back and forth.
- Place SPL sound meter on desk, and follow procedure below for
setting up storage of the readings.
About the Eurorack Mixer
Here is some terminology and placement information regarding the
Eurorack mixer that we are using.
- Power switch: The Eurorack's switch is on the rear
right, immediately next to the power cord input.
- Phantom power: Special voltage required for some
microphones. The phantom power switch is to next to the power
switch. Please keep that power off until all microphone
connections have been made. Microphones don't like to be
plugged in while phantom power is on. Speakers do not like the
resulting loud pop either. I'll remind you of turning the
switch on in the instructions below.
- Channel Strip: a vertical set of controls for one input
channel. The strips are numbered from left to right. For the
experiment only three of the strip controls are relevant; all
others should be left in their default positions.
- Microphone and line inputs are the top-most two jacks,
respectively.
- Microphone pre-amp control is the first black knob
from the top. On Strip-1 the microphone this knob should
be at the last tick below maximum (marked 60db; all the
way clockwise).
- Aux send level (pre-fader) is the fourth of the
gray knobs from the top in each of the strips. We use it
send the full microphone volume to Skype. The setting on
Strip-1 should be one tick below vertical.
- Channel level is the bottom-most gray knob in
each strip.
About the Zoom Digital Recorder
Relevant controls on the Zoom digital recorder are:
Photo 3 (below): The Zoom digital recorder:
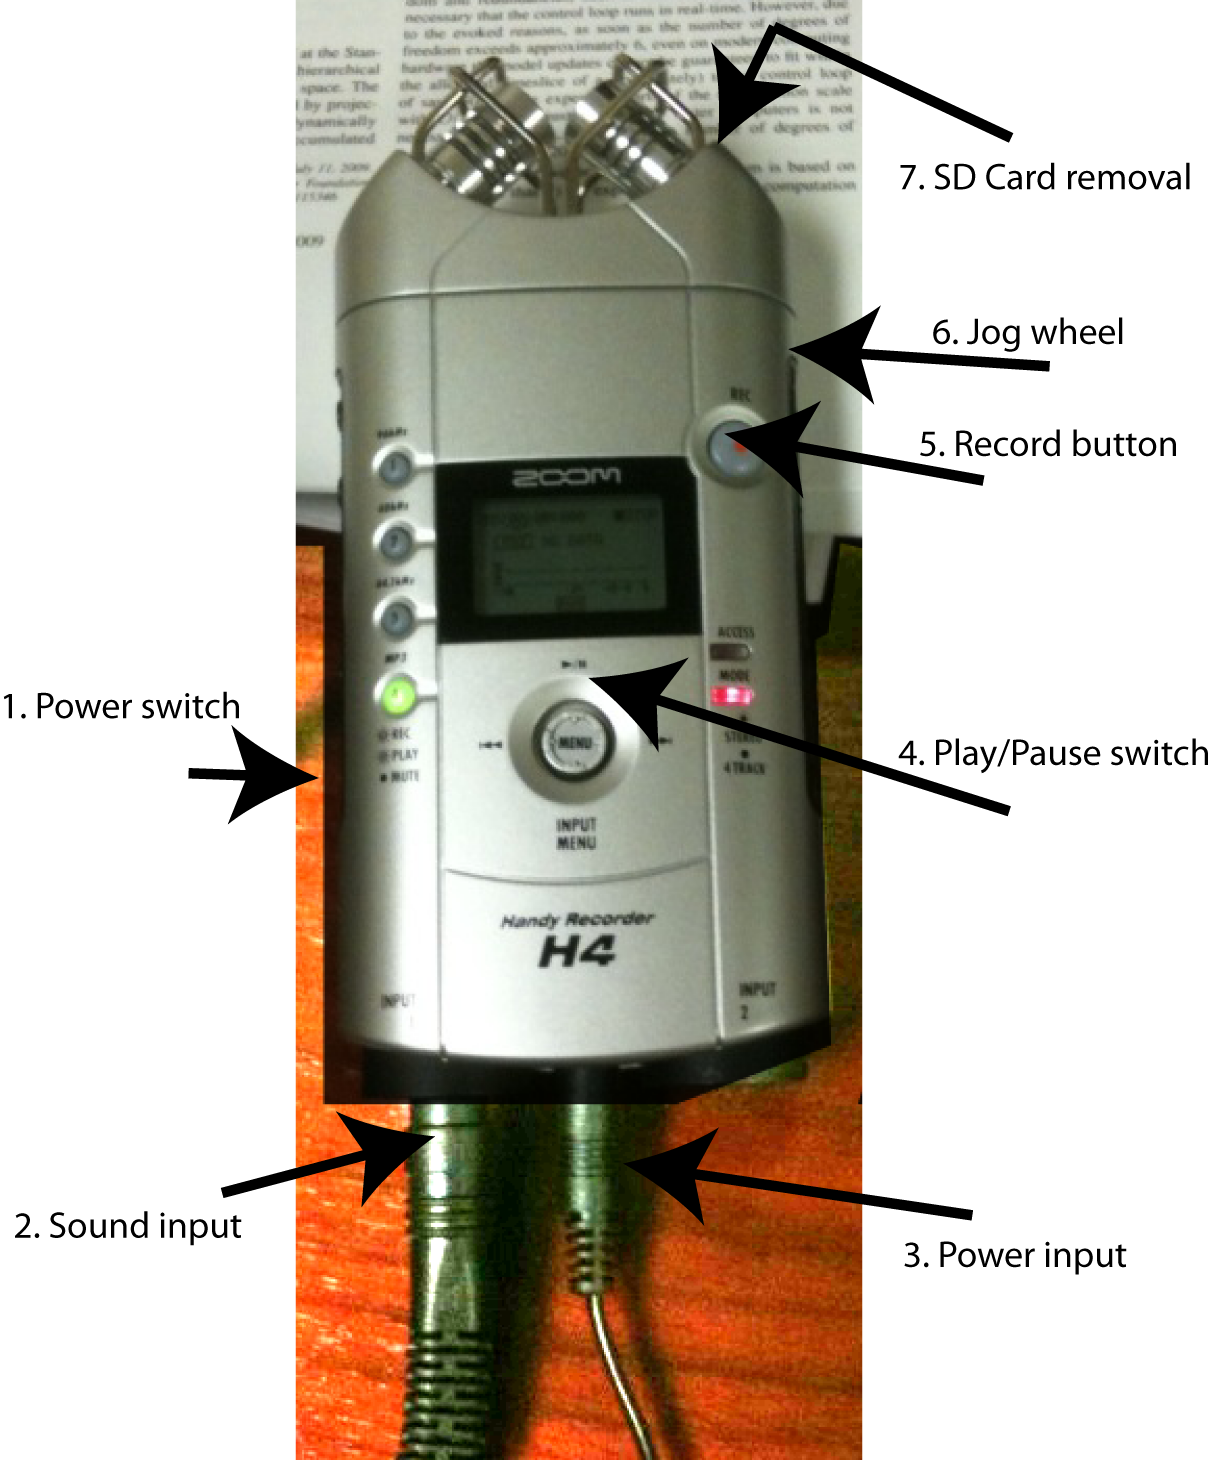
- Power switch
- Sound input (from Mixer CTRL R Out)
- Power input (wall wart)
- Play/Pause switch (push up to toggle between play and pause)
- Record button (push once to check level; push again to record;
push again to stop recording.)
- Jog wheel (only needed to browse and select files on menu)
- SD card removal (door on back of housing)
Setting up Sound Meter Data Recording
The following soundlevel meter instructions are true for both the
Pilot Room and the Locals Room.
See photo 3
The instructions look worse than they
are! I'm just spelling it all out. Nonetheless, the connection between
the sound meter and its laptop is a bit finicky during setup (though
not once the connection is established). See Troubleshooting below.
- Attach the power adapter to the sound meter. The socket in the sound
meter hides underneath the black rubber flap on the left side of the
housing.
- Start up a silverback: Toshiba laptop (Kipling or Poe). Wait until
the laptop is fully booted.
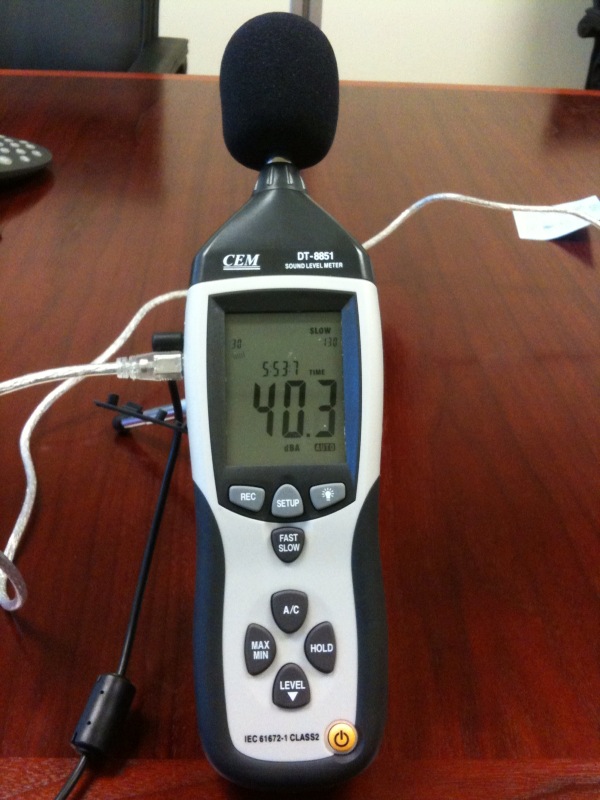
- Turn on the sound meter. Notice a little one-handed clock face on
the lower left of the sound meter display.
- On the sound level meter:
- Press the Max/Min button until neither the word Min nor the
word Max appears on the sound level meter display. (Probably
doesn't to begin with. Just keep pushing).
- Press on the button labeled 'Level' until the scale on the
sound level meter display shows '30...130'.
- Press the Fast/Slow button until the sound level meter
display shows the word 'Slow.'
- Attach the DT-8851 sound meter to the laptop via USB. On the sound
meter, the USB port hides underneath the black rubber flap on the
left side of the housing (next to the power socket).
- On the laptop, double-click the icon that looks like a recycling
symbol. It's labeled: SoundLevelMeter8851. The data gathering
application starts.
- On the laptop: pull down menu Com Port(C) and ensure that entry
Com4(4) has a little black dot to its left.
- On the sound level meter, press the button labeled 'Setup.' You
should now notice that the one-handed clock face on the lower edge
of the sound level meter display has disappeared. You should also
see on the laptop that the picture of the sound level meter shows
sound numbers. If these changes do not occur, press the Setup button
on the sound level meter again, this time more slowly (thinking
loving thoughts.)
One-time Texai Volume Calibration
We need to ensure that the pilot's microphone input level, and the
Texai's loudspeaker volume setting are matched and consistent across
all experiments. We also need to know how loud the background noise
that we generate in the locals room comes across in the Pilot room.
The following calibration process is therefore required once whenever
the experimental setup has been torn down and resurrected, or when
knobs have been messed with.
- Set Texai volume to a standard setting:
- Pilot room: click on the silverback's desktop icon called
"PinkNoise." A media player will start. Click its 'loop clip'
button. Set the mixer's Main volume level until the sound meter
reads 94db.
- In the Locals Room, without background noise,
adjust the Texai volume to generate a 94db
reading on the Locals Room sound meter.
- Return to the Pilots room, and close the media player.
- Determine base sound level in Pilot room:
- For each Background Noise level: measure and record sound
level with pilot silent. (This level will later be
subtracted from compute speaker level to determine the
pilot's voice volume.)
Conducting an Experiment Run
You will perform the following operations with both sound level meters
(i.e. in both rooms). All these operations are executed within the
sound level meter application on the laptop:
- Start the Skype session.
- Double-click the PartyNoise icon on the Locals Room silverback desktop and
set the background noise level to the experimental condition.
- Note the time; write it down.
- Start monitoring
- In both rooms, click on the lightning bolt in the SPL sound
meter application, or Real Time-->Run. The lighting bolt
turns gray, the 'forbidden' sign turns red, and you'll
see a red line graph developing on the application graph
'paper.' You may need to scroll to see the line.
- In Pilot room, turn on the Zoom digital recorder.
- Have the pilot run through the speaking routines.
- Stop monitoring
- Click on the red 'forbidden' sign, or Real Time-->Stop
- Save data
- As txt file: File-->Save As
- As .xls file: Click the spreadsheet icon
Place all log files into:
C:\Users\paepcke\WillowGarageData\Sidetone
- Clear log from memory and the graph
Note: Each logging session can last for 10,000 seconds: 2hrs
45mins. If you need more, modify the 20000 in the setup above.
Note: The exported spreadsheet or csv files do not come with their
'Time' column filled in. You will find only a Date, Value, and Unit
column populated. This deficiency is sad, but not fatal: a reading
is taken every 1/2 seconds. So, if you followed instructions and
noted down the starting time...(you forgot that part didn't you?).
Troubleshooting
Sound Level Meter Data Collection Problems
If the connection between the sound level meter and the silverback
laptop is not establishing properly, there are several steps to
attempt. All need to be performed with hope in your heart, and
positive energy directed towards the devices:
- Press the sound level meter Setup button again; slowly.
- Exit the sound meter application on the laptop. Unplug the USB
cable. Power cycle the sound level meter. Plug the USB cable back
in. Start the sound meter application on the laptop. Press the
Setup button on the sound level meter again; slowly. But not too
slowly.
- Combinations of the above.
- In the sound meter application on the laptop, select menu:
Com Port-->Com4(4)
This menu item should have a little dot in its left margin.
- If Windows crashes, it's the sound meter driver's fault! Just reboot
and start over. It seems like unplugging/replugging the USB tends
to cause crashes.
- Make sure that everything has power.
- Ensure that the following is true (these are the defaults):
- Real-Time data.no to be recorded is set to 20000
- Real-Time Sampling Rate is set to 0.5
- Recording Period ... To: is set far enough in the future to
reach beyond the end of your experiment session.
Cancel out of this dialog.
Windows Crashing (Blue Screen of Death)
I have observed the silverbacks crashing with the famous blue screen
of death. While this almost never happens any more with Vista, the
soundlevel meter data collection driver is capable of causing this sad
event. I have seen the event occur when I unplugged the USB cable that
connects the computer and the sound level meter.
If this happens, just allow the machine to 'Start Windows Normally,'
decline to have Windows look for a solution, and dismiss any other
missives of silverback sadness.
Mixer Not Mixing
- Make sure that the mixer has power: the power switch is in the
back. You should see a green LED on the mixer's surface.
- If the headphone mike is not working, make sure that you also
turned on the mixer's phantom power. That switch is also in the back
of the mixer. You should see a red LED next to the green one.
No Sound from the Pilot Room Speaker (Attached to Pilot
Display)
- Make sure the display is turned on.
- Make sure that the loudspeaker is turned on. The loudspeaker casing
has a black knob on the right, which controls power to the speaker,
and volume. You should see a bluish vertical light in the middle of
the speaker.
Trouble with the Zoom Digital Recorder
- Removing the SD card is a bit intricate. To open the SD card
access door, pull the grated plastic tab away from the housing, then
lift the door, then fold it away from the housing. To remove the SD
Card, you best turn the device upside down, push down on the (spring
loaded) card, and let go.
- For other matters, try to refer to the manual. We are using
'Input 1' with mp3 recording.